It's taken me almost two weeks to get back posting here, since I've been super busy organizing and classifying stuff stashed in different rooms in our apartment. But here I am! So, the good news is that I recently made a new video (available here on YouTube), which is the first of many from my new series: "Party decorations (DIY)". This series is intended for people who love to throw parties or meetings and enjoy setting the scene with cool and creative DIY decorations, literally taking matters into their own hands.
The idea came from the moment when I started planning our civil wedding reception; a small BBQ celebration inside a brick gazebo. We had to diagram and design several decorations to embellish the scene, so we chose different models to create and use for our ornamentation project. This first video shows how to make lovely strings of hanging hearts and confetti.
More DIY decoration videos are on the way for my YouTube channel, as well as other tentative video series. Stick around for cool updates!
It's pretty common to have some ill-fitting shirts in our wardrobes, which usually consist of garments bought without trying them on, or a gift from someone who clearly wasn't familiar with your size. Instead of stuffing these in the abysmal depths of your closet wondering if we'll ever get to wear them, there is a more appealing solution to this problem: resizing your shirt with this easy and quick method.
Below you will find a simple tutorial on how to resize a shirt. Hopefully it will help you recover some clothes that you thought you'd never use again. Please note that this tutorial focuses on reducing the size of a shirt, not increasing it.
Follow me on social media to keep yourself updated on my video tutorials, blog posts, photos, and more!
Full skirts are possibly one of the best fashion items ever invented. They're comfortable, easy to combine, flirty and elegant. You can pair them up with tees, blouses, shirts and cardigans, and you can wear them with sandals, wedges, heels and even slip-ons. You can put together a casual look or a classic outfit with one of these beauties.
In the video below I am sharing my very own tutorial on how to make a gathered skirt. This is how I've made most of my full skirts, with one or two variations.
Follow me if you want to see more tutorials and other curious findings!
My passion for fashion started to develop when I was very small,
possibly due to the fact that I owned a lot of Barbies and loved to dress them
up with an enormous variety of doll-sized clothes. I started crafting clothes
for them with fabric and silicone, until I taught myself how to hand-sew.
After that, I made some other clothes sewing by hand, until my mother showed me
how to use the sewing machine. Some time later, my grandma helped me make the
Dorothy Dress (check out my previous post). Even
later, I dared to make my first dress from scratch and completely on my own.
Crafted from an old fabric that my mom had kept within a fabric
stash since many years ago, the dress follows almost the same pattern as one of
my Ixia dresses. I traced out the pattern directly from a dress and adjusted it
to fit some seam allowance and zipper space.
It is made from some kind of white and blue printed curtain or
tapestry fabric. It holds up nice and
firm, but the fabric is still still somewhat soft. Even though the seams are
not perfect, it still has some pencil markings on the reverse side, and it has
some fitting mistakes, I am very proud of my first serious dress. I wear it
with pride, knowing that it was the start of what has been a wonderful progress
as a self-taught seamstress.
Here’s a collage with several shots of the complete dress-making
process.
Another pattern that I'm very fond of is plaid; perhaps because it's created upon the intersection of stripes or lines (yay!), or maybe because it reminds me of the famous Scottish kilts' fabrics (actually called tartan). I like most color combinations on this type of fabric, and I own a considerable amount of plaid clothing pieces in different colors.
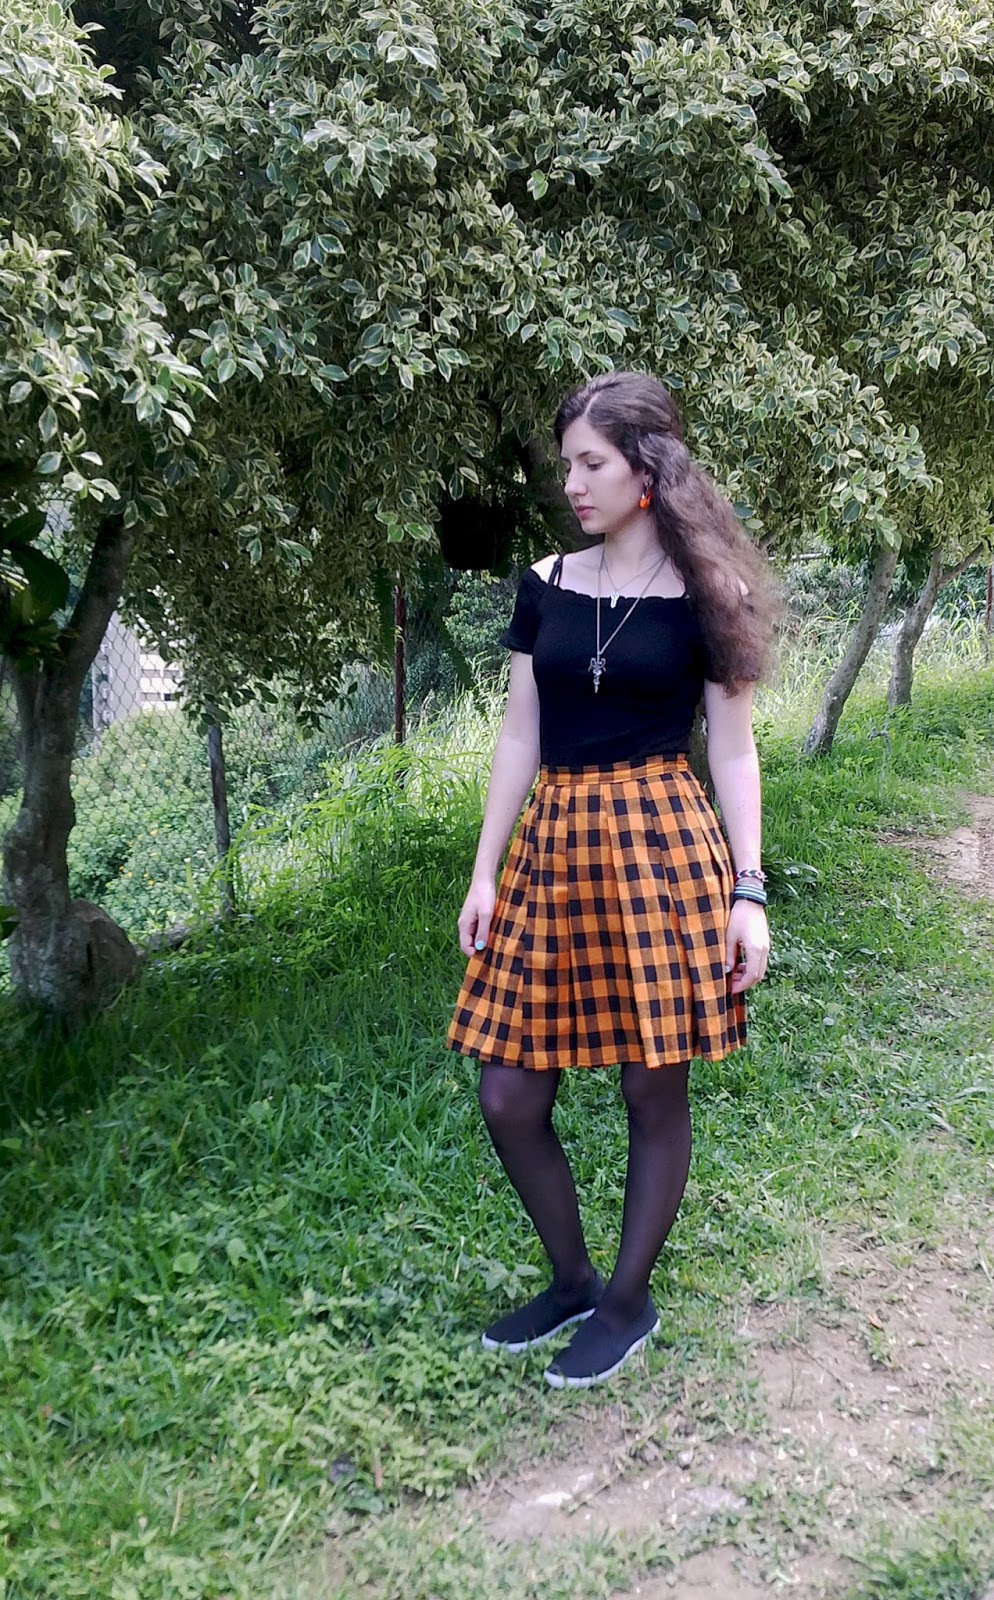
Scarves, dresses, shoes, shirts and skirts have been my outfit choices for these fabrics, which I have in a set of different colors: red, dark blue, dark green, yellow, pink, and orange. In the pictures I am wearing a black and orange plaid pleated skirt, which I made using only a meter of Abercrombie cotton. This was the first pleated skirt that I ever made.
If you've already mastered how to make a gathered skirt, making a pleated skirt is just going to take one different step. Instead of gathering the border of the skirt in order to sew it to the waistband, you have to calculate how many pleats you want or how wide you want them to be. Based on that, divide the length of the complete skirt rectangle into the number of pleats wanted. That will give you an average number of the width for each pleat. (Take into consideration that one pleat has three layers, since it is made in a zig-zag overlay. The width must be for the complete pleat. Ex: 9cm: 3cm - 3cm - 3cm). All that's left to do is create the pleats, adjust them, and sew them onto the waistband.
The color mix of this skirt might look a bit Halloween-ish, which it's perfect because I adore Halloween and its color combos. Speaking about Halloween... October is so close by! That means costume-planning time is right around the corner, and I will definitely be making a post about it.
A long time ago I bought some really unexpensive purple heels from a shoe store. I really loved the velvety fringe on the back of the shoes, and I most certainly needed a pair of purple heels.
A couple of months went by without me wearing the shoes. One day, as I took them out of the box, I realized they were peeling and had some stains on them -and they were still brand new! I was horrified about this and failed to plan what to do with them. I thought about covering them with purple fabric, but it didn't seem as such a good idea. Meanwhile, the pair rested on its box waiting for me to find a solution.
Some time later I came across a small business that sold glitter heels and sandals. That gave me the idea of covering the peeled parts of my shoes with purple glitter, saving them in a brilliant -pun intended- way. In the meantime, I peeled everything off and gave them a skimpy coat of purple paint.
My search for packs of purple glitter began, only to find out that apparently every craft shop, stationary store and other school supply businesses in town had ran out of purple glitter. Perfect. Just perfect. I kept looking for purple glitter occasionally, failing to succeed in my quest. I eventually found one or two places that had purple glitter, but frankly it was a hideous shade of color.
About one month ago I finally found the cherished packs of purple glitter. I went ahead and bought four of them just to make sure I would have enough to cover the whole pair. When I got home I decided to give a paint job to the heels first. I proceeded to prepare a mix using one part of shiny magenta fabric paint, one part of metallic blue acrylic paint, and a bit of black fabric paint.
I could not believe the amazing purple color that now rested on the cup after blending in all the colors. It was so dreamy, reminiscent of galaxy shades of purple. I started painting the shoes with a small brush and immediately fell in love with how they looked. I was even feeling the need of not coating them with glitter after they had dried. So I finished painting them and left them to dry for a whole day.
The heels looked so fabulous that I finally decided to skip the glitter. I gave them two coats of hairspray and left them outside to dry. That day, it rained. I got really sad because I thought all my work was probably damaged, only to discover that the shoes had survived epically and the paint remained as good as ever.
So if you have a pair of peeling or worn-off pleather shoes, I would definitely recommend taking off all the damaged material and finding a nice paint blend to restore them. You can also DIY them with glitter, but make sure to paint them with a base coat before covering them completely in sparkles. More posts will be coming up next week!
Adam Saaks is a world-class famous fashion designer from Los Angeles whose creations have been modeled by numerous stars and featured in many TV broadcasts and social events. His style consists of a very quick but delicate nip-and-tuck performed on any clothing item of stretchy fabric. Pants, shirts, dresses, swimsuits and more get a Saaks makeover with many cuts, stretches and rips done by the designer, who puts it all together into one peculiar and unique handcrafted masterpiece. His recognizable style stands over two main pillars:
1. Adam Saaks likes to shred clothes.
2. He can do it on-the-go.
Adam is publicly known for his precise and creative cutting skills, leading his fans to name him "The Master Shredder", "Fashion Butcher", "T-Shirt Circumciser" and "Adam ScissorHands". Some of his videos called "Shredded" have become very popular in his Youtube channel nowadays, with more than 45,000,000 total views. "Shredded" is nothing else than a fashion travel show where Mr. Saaks does public displays of his abilities, showcasing real-time fashion creations both on random pedestrian women and models. The clothing's concept could be showing some skin in a sexy way, but instead of cutting everything off in a vulgar way, he focuses on fabricating intricate knits, twists and patterns with the fabric itself.
"Shredded" with Adam Saaks in New York City
Saaks once explained in an interview that his idea of shredding clothes came out by mistake. He had been a designer working with fabrics and models for ten years, and one day he was asked to cut a shirt in public. He started doing so and his performance started to draw people close who were amazed by his curious skills. "Everyone started applauding and I wasn't even done" stated Adam. He felt the emotion and expectation building up and he knew at once that it was his thing. "I thought: This is so natural to me... The crowd loves it, I love it, the girl loved it. So it was a pretty good formula and I fell in love with it with the first shirt I ever did" said Saaks.
Working with the item's lines, angles and edges is one of the main principles Adam likes to follow. Using the selected piece as a guideline, he imagines where and how the cuts could go along and merge into the clothing item. He then slices it up, knots and weaves the strips, and adds some finishing touches.
Well this certainly looks familiar...
Adam travels the world showcasing his high fashion street art. He's been in talk shows, TV interviews and fashion shows worldwide. United States, Turkey, Austria, India, Belgium, Philippines, Thailand, France, Sweden, Russia, Italy, United Arab Emirates, Korea and many other nations have made it into Saaks's performing locations. On the other hand, as I mentioned earlier, famous international superstars, models, actresses and others have been "shredded" by Adam Saaks.
For example Shakira features one of Adam's creations in her "La La La (Brasil 2014)" FIFA World Cup video. The piece was handcrafted by Saaks and named after Shakira: "Shak Long Sleeve Body Suit", which can now be purchased online in a variety of colors and sizes for 450$.
These are some of the many celebrities that have been "shredded" by Adam Saaks. You can view more if you click here.
Heidi Klum (German top model and actress)
Mila Kaladjurdjevic (Montenegro top model)
Giulia Arena (Miss Italy 2013)
Moani Hara (Miss Hawaii 2014)
Shakira (Colombian singer)
Red Foo (American singer)
Mariah Carey (American singer)
Michelle Ashman (American actress)
Sameera Reddy (Indian Bollywood actress)
Jayde Nicole (Canadian model)
"Shredded" with Adam Saaks, cut dress on Mila Kaladjurdjevic
To this day, Adam Saaks has already written a book "Love At First Cut" and opened an online store where you can order custom made pieces (of course, handcrafted by Adam himself). He also currently offers online booking for personal appearances and promotes his Cutting Tour Dates, including performances in a long list of live shows throughout the world.
Learn more about Adam and his famous shredding in his official webpage.
Spongebob's pineapple definitely portrays a unique and funny home choice. Now you can have your own with this make-your-own pineapple mini tutorial!
These are the materials you will need to make this awesome piece:
-Pottery clay
-Water
-A balloon
-Pottery tools (A toothpick and a knife will do just fine)
-A sponge -Paintbrushes
-Paint:
+Green for the leaves
+Yellow for the pineapple
+Light blue for the windows, chimney & door
+Orange for the details
Here's a small step-by-step with supporting images of the process:
1. Inflate the balloon just above the minimum capacity and build the pineapple's body around it. Make sure to make the bottom flat. 2. Carve out the two circles for the windows and a smaller lateral circle to insert the chimney. 3. Make the outer door and window frames molding thin clay rolls (about half a centimeter thick). Attach them to the body by making small markings with the toothpick on the areas to put together, wet them a little and stick the parts to the body. (You can also make the whole door with the helm instead of just the arch). 4. Make another roll for the chimney and attach a bell-like ending. Stick it into the lateral hole. 5. Take out the balloon carefully through the bottom of the body for the pineapple to stand on its own. 6. Trace the body lines with the toothpick or carving tool. Don't make them too deep or you could end up cutting part of the body! Then do the "X" markings in the middle of each "diamond" in the body.
7. For the leaves, make a half-centimeter thick layer and cut out 9 leaves: Starting from a middle leaf, draw the other four to each side, each becoming smaller than the last one. Then order them in a triangular shape (biggest in the middle, smallest on the edges). Attach them together with the same technique as before. Wet your sponge a little and rub it on the leaves smoothly to flatten any irregularities. 8. Attach the whole leaf bunch into the center-top body of the pineapple (same technique as before).
9. Leave it all to dry for a couple of days. (Unless you have one of those fancy pottery ovens).
10. Once dry, paint it all. I started by painting the orange details and the inner piece. Then I moved on to the yellow part. Next, the leaves. Afterwards, the door, windows and chimney. Finally, I passed a brush with orange dust-paint over the whole body in order to give it that fresh-pineapple appearance. 11. You can later coat the piece with white glue or varnish for extra protection. If you are going to use it on a fish tank or over humid dirt, you MUST bake it and coat it at least twice with varnish.
Voilá! A perfect Spongebob's pineapple home.
You can use this pineapple as an ornament, as a cake topper, as an aquarium decoration or as anything you like. I personally made this one as a home for my escargot snail, Gary. Unfortunately he passed away before I managed to finish it properly. Now I just use it as a decorationin my tiki-themed bedroom.