Showing posts with label fabric. Show all posts

August 19, 2017

Strolling through Sea World in my colorful squares skirt

Whoever knows me very well can tell you how enormously fond of theme parks I am. It might seem shallow to some, but I think there's no greater feeling than walking into a magical land filled with excitement, thrilling rides, beautiful settings, scrumptious food and an overall mood of joy. It might be one of my favorite feelings in the world. Sometimes I feel sad and nostalgic when it's been a long time without me going to a top-notch amusement park, especially because such a wonderful place makes me feel at home.

The last time I visited Sea World was during our honeymoon, last March. I'd never really taken much care for what I wore to the parks, but with it being a special occasion and given that I'm really into sewing and fashion, I decided to pack better outfits for our adventures. In this case, I chose to wear a gorgeous black tee with a blue macaw (a gift from my husband) with my colorful squares skirt. You might find this skirt familiar because it is precisely the gathered skirt that I show how to make in my YouTube tutorial. Since the weather was quite cold, I paired the outfit with my favorite sweater: a cozy Jack & Sally reversible hoodie from Hot Topic. I also threw in a very loyal and comfortable pair of sneakers from the ever-fabulous Payless Shoe Source store.

First of all, I want to say that I didn't really plan the outfit. I just knew our honeymoon would be the perfect moment to debut this gathered skirt. While I was choosing what to wear to Sea World, I rummaged through the pile of black and white tees that I'd packed, until inspiration hit me as soon as I saw this macaw one. What I loved the most was that the colors of both garments were practically meant to be together. Actually, that's also my favorite thing about the skirt: the color palette. Greens, yellows, blues and black are all combined into a very well-thought squared pattern decorated with animal icons and names. The cotton fabric literally looks like kids' blocks tiled far and wide across a solid light blue background. This adds an element of fun to the skirt, and it sure looks curious!

This was certainly not the first gathered skirt I made. By the time I confected it I already felt confident enough to make it out of thin air, and that's why I used it to film the tutorial. I've received lots of positive feedback for it, encouraging me to make more sewing tutorials... Which I will make in due time (or when I actually HAVE time). For now, I just love to wear this colorful skirt knowing that maybe, just maybe, one day someone will recognize it.

Making a gathered skirt is not a very complicated project. I can tell you it's much easier than creating a dress or a jacket. However, when you're new at sewing you might find it to be a daring task, especially with the gathering process and inserting the zipper. Fortunately, this wasn't the case with my skirt, albeit the Slytherin and Gryffindor inspired skirts that I posted previously in the blog were totally the case. Featuring three meters of hand-gathered fabric, a medium waistband and a back zipper and hook-and-eye closure, this beautiful skirt falls into a girly-comfortable clothing category. It was delightful to wear it on a promenade through Sea World, hauling no complaints from yours truly. And, oh surprise, my outfit also matched the park's colors!

Naturally, I came to the conclusion that my colorful squares skirt deserved a spotlight with a review in my blog after being the protagonist of what has been my most popular YouTube tutorial so far. So here it is. We walked around the whole Sea World park. We rode Manta, Kraken and the newest Mako roller coaster. We were stranded for ten minutes in front of the penguin window inside Empire of the Penguin. We had to run and seek shelter from the rain. To my worst regrets, we did not get a chance to ride Journey to Atlantis because they decided to do maintenance that same day. We watched dolphins, turtles, sharks, rays, belugas, walruses and sea lions swim. I enjoyed the whole park in my incredible skirt and felt fabulous all day. I think I've found my staple clothing item for amusement parks!

I must say I already miss the enthusiasm and the adrenaline rush from being at the parks. Hopefully we'll get to visit one soon, and I'll have some more gathered skirts awaiting their debut at a theme park too.

Thank you for reading! Remember to follow our adventures on Instagram @edu_and_joy 


July 14, 2017

Tropical Hawai'ian sarong dress: A sewing challenge made from scratch

It's been several years since I've become a super Hawai'ian addict. I'm not certain about where my deep love for Hawai'i and everything related to it comes from, but it has shaped my taste and driven an important part of my style toward tropical themes. I even decorated my room, celebrated my last birthday, themed our wedding and planned on setting part of our new home with a Hawai'ian design.

Following this trend, it's natural that I feel quite attracted to tropical patterns (especially on fabrics because of my seamstress instincts). That is why as soon as I spotted this light blue and pink hibiscus fabric, I knew it would be perfect for a new sewing project. It wasn't that hard to imagine what kind of garment could work nicely with it: I pictured a classical sarong dress almost immediately.

Since I didn't own a sarong dress it would be a great addition to my closet. The problem was that I couldn't find any sarongs or similar dresses among my pattern stash. After taking an online tour through some of my favorite but few shops that sell sarong dresses, I realized that most frocks featured faux wrap-around skirts. I really wanted a real wrap-around model, so I finally decided to take a leap of faith and create my very own pattern from scratch.

Drafting a pattern off the top of one's head is quite a challenging task, especially if you have no guidelines to help you do it. With a little imagination, calculating, a somewhat bold combination of two different bodice patterns, and a blend of hope and luck, I traced out a complete sarong dress pattern tailored to my measurements. After analyzing it for a while checking for imperfections, I crossed myself, began cutting out the pieces from the fabric and hoped for the best. There could be no room for big mistakes, since I always tend to buy only the necessary amount of fabric in order to reduce costs.


When all the pieces were cut, I proceeded to do everything the way most of us sew our garments. First I matched the edges and pinned them down, and then I basted everything in place. This was a specially tense moment because it became the first time I tried on the dress. To my very good luck I only had to perform some alterations to size it down and make it fit more snug. Then I sewed all the way until the dress was finished.

In the pictures you can see me wearing the completed dress, paired with a pink flower hair comb,  a white puka shell necklace, a pink Chinese parasol (which I got from the China pavilion at Epcot), and black sandal wedges (I forgot to pack more theme-appropriate shoes). The dress is made from lightweight printed cotton, with a light blue background covered in pale pink hibiscus and palm leaves. As I mentioned before, the garment is fully wrap-around, featuring a small side buttonhole that allows the inner belt to tighten the fit, wrap the open dress, and come forward to make a nice frontal bow with the other end of the belt. The bodice is made with two overlapping panels connected by a halter strap, also forming a sweetheart neckline. You can appreciate some subtle pleats in top half of the skirt, neatly draped forming a curve over the other half.


I have to say that the most challenging part was creating the pleats of the skirt without making it look bulky, as well as making sure that the wrap-belt was tight and strong enough to hold the whole dress in place. It is definitely one of the most daring sewing projects I've ever pursued, but after taking the risks I was extremely happy with the final results. I think I'll be making a couple other sarong dresses when I find the right tropical fabrics, which of course I shall be sharing in a future blog post.

Thank you for reading and keep a look out for more articles in the near future! 


April 28, 2017

How to resize a shirt [Tutorial]

It's pretty common to have some ill-fitting shirts in our wardrobes, which usually consist of garments bought without trying them on, or a gift from someone who clearly wasn't familiar with your size. Instead of stuffing these in the abysmal depths of your closet wondering if we'll ever get to wear them, there is a more appealing solution to this problem: resizing your shirt with this easy and quick method.

Below you will find a simple tutorial on how to resize a shirt. Hopefully it will help you recover some clothes that you thought you'd never use again. Please note that this tutorial focuses on reducing the size of a shirt, not increasing it.


Follow me on social media to keep yourself updated on my video tutorials, blog posts, photos, and more! 

Instagram: @edu_and_joy
YouTube: Joy Casas
Pinterest: Joycasas
Twitter: @joycasas
Facebook: Joy's Paradise Cove

October 22, 2016

How to make a gathered skirt [Tutorial]

Full skirts are possibly one of the best fashion items ever invented. They're comfortable, easy to combine, flirty and elegant. You can pair them up with tees, blouses, shirts and cardigans, and you can wear them with sandals, wedges, heels and even slip-ons. You can put together a casual look or a classic outfit with one of these beauties.

In the video below I am sharing my very own tutorial on how to make a gathered skirt. This is how I've made most of my full skirts, with one or two variations.


Follow me if you want to see more tutorials and other curious findings!

October 12, 2016

My first serious dress

My passion for fashion started to develop when I was very small, possibly due to the fact that I owned a lot of Barbies and loved to dress them up with an enormous variety of doll-sized clothes. I started crafting clothes for them with fabric and silicone, until I taught myself how to hand-sew. After that, I made some other clothes sewing by hand, until my mother showed me how to use the sewing machine. Some time later, my grandma helped me make the Dorothy Dress (check out my previous post). Even later, I dared to make my first dress from scratch and completely on my own. 
Crafted from an old fabric that my mom had kept within a fabric stash since many years ago, the dress follows almost the same pattern as one of my Ixia dresses. I traced out the pattern directly from a dress and adjusted it to fit some seam allowance and zipper space.
It is made from some kind of white and blue printed curtain or tapestry fabric. It holds up nice and firm, but the fabric is still still somewhat soft. Even though the seams are not perfect, it still has some pencil markings on the reverse side, and it has some fitting mistakes, I am very proud of my first serious dress. I wear it with pride, knowing that it was the start of what has been a wonderful progress as a self-taught seamstress.
Here’s a collage with several shots of the complete dress-making process.

Keep an eye out for more fashion posts! 

September 25, 2016

Pretty in plaid and pleats

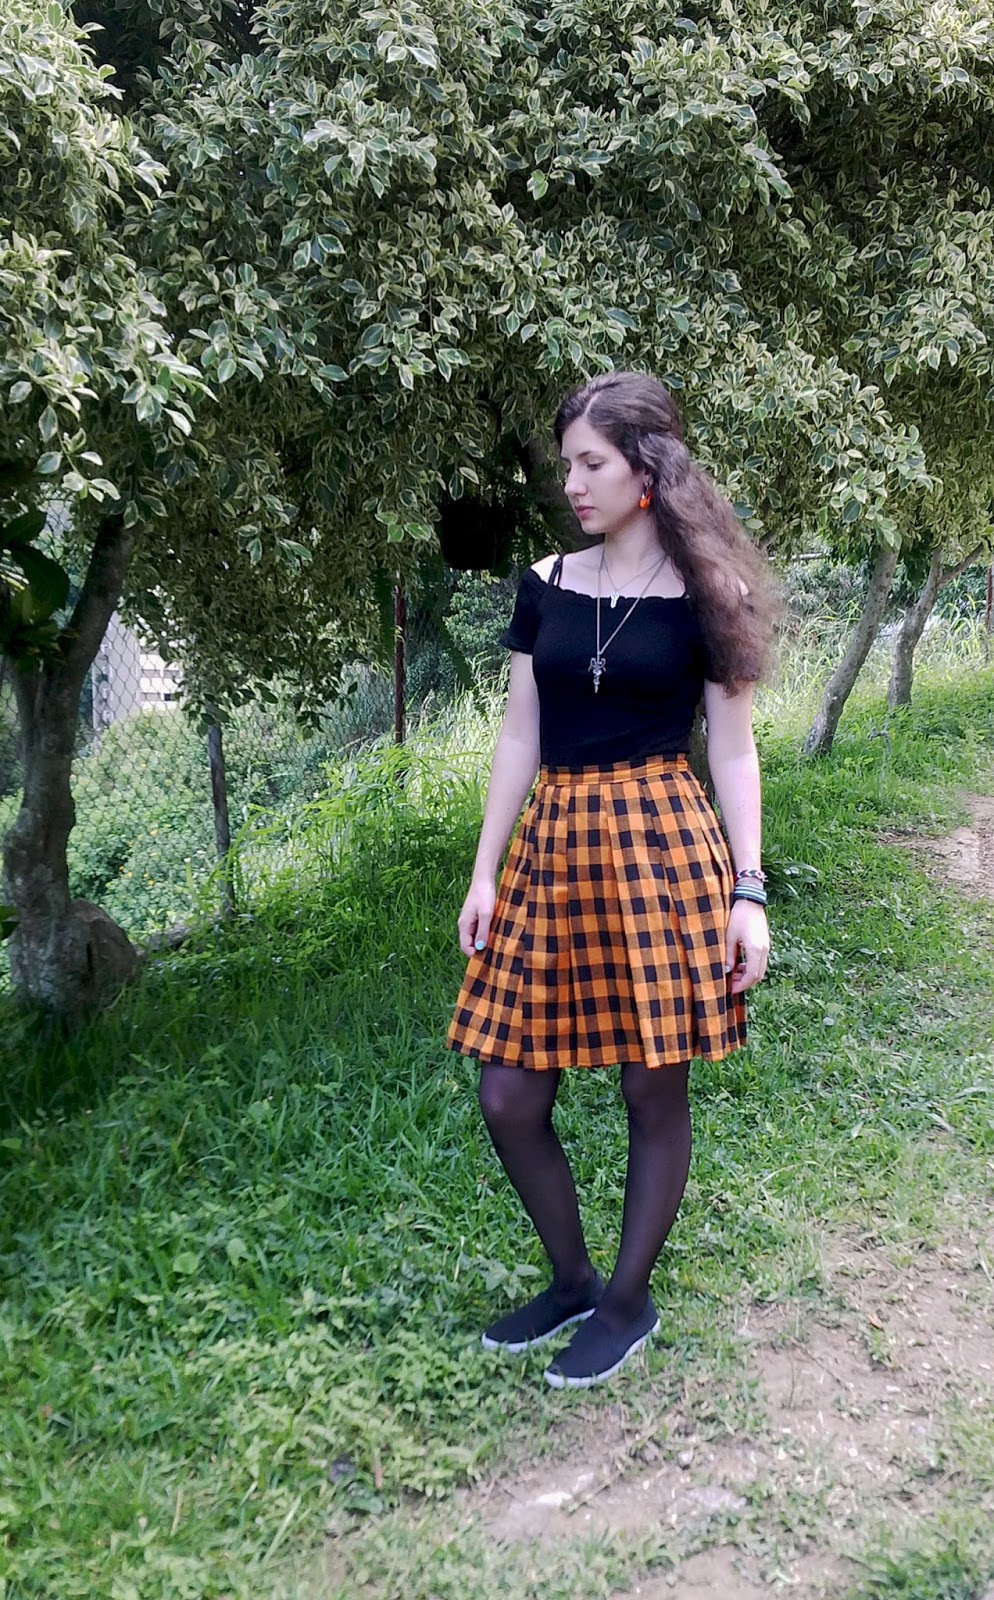
Another pattern that I'm very fond of is plaid; perhaps because it's created upon the intersection of stripes or lines (yay!), or maybe because it reminds me of the famous Scottish kilts' fabrics (actually called tartan). I like most color combinations on this type of fabric, and I own a considerable amount of plaid clothing pieces in different colors. 
Scarves, dresses, shoes, shirts and skirts have been my outfit choices for these fabrics, which I have in a set of different colors: red, dark blue, dark green, yellow, pink, and orange. In the pictures I am wearing a black and orange plaid pleated skirt, which I made using only a meter of Abercrombie cotton. This was the first pleated skirt that I ever made.
If you've already mastered how to make a gathered skirt, making a pleated skirt is just going to take one different step. Instead of gathering the border of the skirt in order to sew it to the waistband, you have to calculate how many pleats you want or how wide you want them to be. Based on that, divide the length of the complete skirt rectangle into the number of pleats wanted. That will give you an average number of the width for each pleat. (Take into consideration that one pleat has three layers, since it is made in a zig-zag overlay. The width must be for the complete pleat. Ex: 9cm: 3cm - 3cm - 3cm). All that's left to do is create the pleats, adjust them, and sew them onto the waistband.

The color mix of this skirt might look a bit Halloween-ish, which it's perfect because I adore Halloween and its color combos. Speaking about Halloween... October is so close by! That means costume-planning time is right around the corner, and I will definitely be making a post about it. 

 Stay tuned for more fashion posts! 

August 24, 2016

Restoring a pair of heels - an unnecessary oddisey

A long time ago I bought some really unexpensive purple heels from a shoe store. I really loved the velvety fringe on the back of the shoes, and I most certainly needed a pair of purple heels.

A couple of months went by without me wearing the shoes. One day, as I took them out of the box, I realized they were peeling and had some stains on them  -and they were still brand new!    I was horrified about this and failed to plan what to do with them. I thought about covering them with purple fabric, but it didn't seem as such a good idea. Meanwhile, the pair rested on its box waiting for me to find a solution.

Some time later I came across a small business that sold glitter heels and sandals. That gave me the idea of covering the peeled parts of my shoes with purple glitter, saving them in a brilliant -pun intended- way. In the meantime, I peeled everything off and gave them a skimpy coat of purple paint.

My search for packs of purple glitter began, only to find out that apparently every craft shop, stationary store and other school supply businesses in town had ran out of purple glitter. Perfect. Just perfect. I kept looking for purple glitter occasionally, failing to succeed in my quest. I eventually found one or two places that had purple glitter, but frankly it was a hideous shade of color.

About one month ago I finally found the cherished packs of purple glitter. I went ahead and bought four of them just to make sure I would have enough to cover the whole pair. When I got home I decided to give a paint job to the heels first. I proceeded to prepare a mix using one part of shiny magenta fabric paint, one part of metallic blue acrylic paint, and a bit of black fabric paint.

I could not believe the amazing purple color that now rested on the cup after blending in all the colors. It was so dreamy, reminiscent of galaxy shades of purple. I started painting the shoes with a small brush and immediately fell in love with how they looked. I was even feeling the need of not coating them with glitter after they had dried. So I finished painting them and left them to dry for a whole day.

The heels looked so fabulous that I finally decided to skip the glitter. I gave them two coats of hairspray and left them outside to dry. That day, it rained. I got really sad because I thought all my work was probably damaged, only to discover that the shoes had survived epically and the paint remained as good as ever.

So if you have a pair of peeling or worn-off pleather shoes, I would definitely recommend taking off all the damaged material and finding a nice paint blend to restore them. You can also DIY them with glitter, but make sure to paint them with a base coat before covering them completely in sparkles.

 More posts will be coming up next week!